Sectioning of Tissue: It is a critical step in various scientific and medical fields, particularly histology, pathology, and microscopy.
Sectioning of tissue or Section cutting
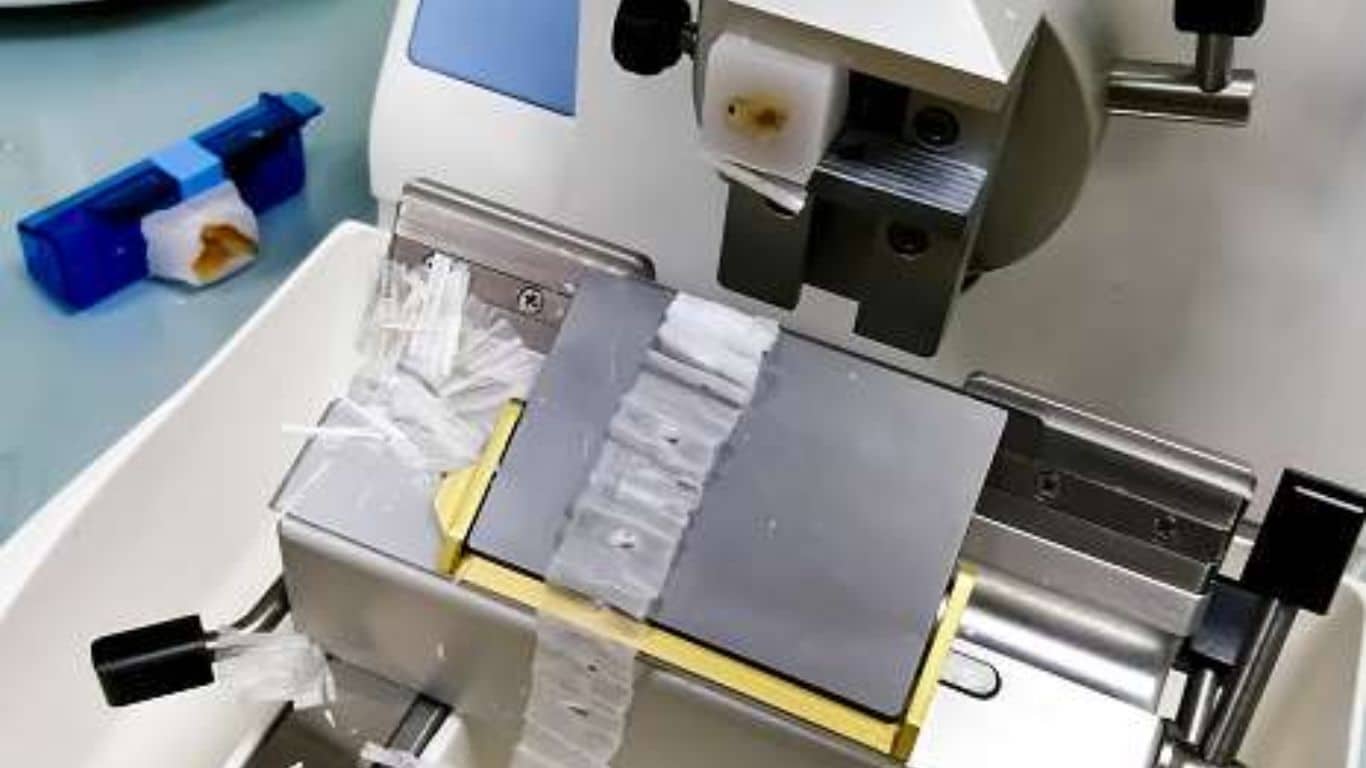
- This is a process in which the tissue is cut from the paraffin block with a microtome. When ready to section a paraffin embedded organ or tissue
- Insert the appropriate knife in the holder or change disposable blade if necessary and tie or screw properly. Ensure to tie the knife clamp screw securely
- Apply ice to the surface of the block for a few seconds and wipe off the water from the block surface. This is done to aid sections cut easily
- Place or clamp the paraffin block in the microtome by pulling the medial arm forward, in a position away from the knife or blade to avoid accidental cut through the tissue.
- Adjust the microtome stage so as to move the paraffin quadrate close to the microtome plate
- Unlock the microtome wheel with the appropriate button.
- Next place both hands on either side of the finger guard and pull it down as to reveal the microtome plate. (Always lock the wheel back into place when not sectioning).
- Use the section thickness adjustment knob to set initially to approximately 15µ (microns) so as to trim any excess wax and thereby expose a suitable area of tissue for sectioning.
- After exposing a suitable area of tissue, set the section thickness to 5µ. (The appropriate thickness level for routine purposes is between 3 and 5 µ).
- Move the tissue surface of the block parallel to the edge of the knife to obtain straight ribbon of sections.
- Turn the wheel to begin to cut into the paraffin specimens and continue turning until a desired section is obtained, making a ribbon that contains multiple sections of the tissue.
- Use twizers or small forceps to collect the paraffin ribbons from the microtome and then place on the slide that has been smeared with adhesive.
- Gently pour 30% alcohol upon one end of the slide and tilt it obliquely to enable the solution to spread over the ribbons and thus facilitate their flattening out during the subsequent step.
- Next, place the ribbon to float on a water bath regulated at 450C so as to flatten or straighten the ribbon and also remove any shrinkage.
- Use a blade or forceps to split the ribbon of sections floating on water to obtain individual or groups of sections as desired.
- Prior to picking up tissue sections that float on water to mount on a blank slide, first apply some adhesive on the frosted surface of the slide, as noted in XI above (see end note 3 for a guide to prepare adhesive).
- When picking up the section from water, immerse the adhesive-smeared slide vertically to about three-fourths the length of the slide to bring the section in contact with it.
- Lift the slide vertically from the water to find the section flattened on to the slide
- Blot sections lightly with blotting paper to remove excess water and to increase contact between slide and section, or keep the slide in upright position for several minutes to drain.
Defects, Causes and Remedies
Histologists are confronted often with difficult tissue blocks that will not section easily, for example, brittle or shrunken tissue, improperly infiltrated tissues, or sections with, holes or scratches in them.
If the tissue block appears to be brittle, a 10% diluted ammonium hydroxide solution may be applied (via soaking) to soften the tissue to prevent cracking and to more easily facilitate sectioning.
If sections have holes in them, this can be indicative of incompletely infiltrated tissue. This may be alleviated by placing the tissue block back in the heated wax bath to melt it and then proceed to re-embed the block.
If artefactual scratches or tears occur across the tissue sections, this may be indicative of flaws or dirt on the cutting edge of the knife and may be alleviated by repositioning or replacing the blade.
If the tissue block appears to be too soft or too hard. If too soft, a remedy may be to place the block tissue side down on several sheets of Kimwipes or paper towel in the freezer (−15°C) or a refrigerator (0–4°C) (chilling times may vary), prior to sectioning.
If too hard, a piece of wet cotton/Kimwipe may be placed in lukewarm water and then placed over the surface of the block (times may vary). This will allow the tissue to expand/swell and soften as it absorbs water.
It should be noted, however, that with either too soft or too hard tissue blocks, these solutions are temporary and may allow only a few successful sections to be cut.
Staining
The slides are then processed down to water, since most staining solutions are water-based.This requires a graded series of alcohols to prevent severe convection currents that would damage the tissues. Following staining, the slides are dehydrated again through a graded series of alcohol, cleared in xylene or toluene, and coverslips are applied using a plastic mounting medium that is miscible with the clearing agent.
The sections, as they are prepared, are colourless and different components cannot be appreciated.
Staining them by different coloured dyes, having affinities of specific components of tissues, makes identification and study of their morphology possible.
Staining of histological sections allows observation of features otherwise not distinguishable.
Certain terminologies used in the following account are given below.
1. Basic stains: basic dyes are alkaline and posses amino (NH2-) radicals and produce hydroxyl ions. These are cationic stains. These dyes posses strong affinity towards negatively charged structures such as nuclei. These components are called as basophilic. Eg. Safranine, methylene blue, etc.
2. Acid stains: posses radicals that yield hydrogen ions such as sulphonic, carboxyl or hydroxyl groups. These stains are also called anionic and they have strong affinity for the basic components of cells such as cytoplasm. Eg; eosin, congo red
3. Neutral stain: those in which the acidic moiety as well as basic components of the dye are coloured. They stain both acidophilic and basophic structures. Eg., Romanovsky stain, which is the combination of methylene blue with eosin.
4. A counterstain is a stain with colour contrasting to the principal stain, making the stained structure more easily visible. example is eosin counterstain to haematoxylin in the H&E stain. Acid stain is usually employed as a counter stain after a nuclear stain.
5. Mordents: some stains cannot directly stain the tissue unless a mordent is present. The mordant binds to the chemical dye, helping to hold it so it remains stuck to the organism. A mordant is classically defined as an ion that binds a chemical dye and holds it down, such that the dye remains stuck on the tissue.
Substance that causes certain staining reactions to take place by forming a link between the tissue and the stain. The link is referred as lake. Without it, dye is not capable of binding to and staining the tissue. e.g. Ammonium and Potassium alum for haematoxylin.
Eg., Gram’s Iodine is used a mordant (that fixes the crystal violet to the bacterial cell wall) in Gram satining procedure. Gram staining is performed when the chemical dye crystal violet is mixed with the mordant iodine. Iodine and crystal violet form a large complex that precipitates out of solution. During the staining procedure, the bacteria are bathed in alcohol, which causes the cell walls to shrink. This shrinkage traps the iodine-crystal violet complex in the cell wall, which gives Gram-positive bacteria a purple color
6. Differential staining: Is a staining process which uses more than one chemical stain. Using multiple stains can better differentiate between different microorganisms or structures/cellular components of a single organism. One commonly recognizable use of differential staining is the Gram stain. Gram staining uses two dyes: Crystal violet and Fuchsin or Safranin (the counterstain) to differentiate between Grampositive bacteria (large Peptidoglycan layer on outer surface of cell) and Gram-negative bacteria.
7. Vital staining: Staining of structures in living cells, either in the body (in vivo) or in a laboratory preparation (in vitro). e.g. Janus green is taken up by living cells and stains the mitochondria. A vital stain is a stain that can be applied on living cells without killing them. Eg., janus green.
The basic steps in staining and mounting paraffin sections are as follows:
1. Deparaffinization (clearing)
2. Hydration
3. Staining
4. Dehydration and clearing
5. Mounting
1. Deparaffinization
- Removal of wax is done with xylol.
- It is essential to remove the wax completely, otherwise subsequent stages will not be possible.
- At least 2 to 3 changes in xylol are given for suitable length of time.
- Sections of this stage should appear clear and transparent.
- Presence of any patches indicates the presence of wax and sections should be kept longer in the xylol
2. Hydration
- Most of the stains used are aqueous or dilute alcoholic solutions.
- Hence it is essential to bring the section to water before the stains are applied.
- The hydration is done with graded alcohols from higher concentration to lower concentration. Alcohol and acetone are miscible with xylol.
- First change is made to absolute alcohol or acetone followed by 90%, 70% alcohol and finally distilled water
3. Staining
- Various staining procedures are applied from this hydrated stage.
- The most common stain applied for histological study is Haemotoxylin and Eosin
- Washing and rinsing of tissue sections is a necessary part of most staining techniques.
- It eliminates carrying over of one dye solution to the next. Excess dye, mordants, or other reagents might react unfavourably or precipitate when placed in the fluid employed in the next step.
5. Dehydration and clearing
- Dehydration is done is graded alcohols or acetone from 70% to absolute alcohol or acetone. Dehydrating alcohol and acetones can remove some of the stains.
- Time has to be suitably modified to minimize fading of stains.
- Since alcohol and acetone are miscible in xylol, it is used for clearing the sections.
- Any sections from which water has not been completely removed would give a milky appearance after the first xylol. Such sections should be returned to absolute alcohol and the process repeated.
- Mounting is done after 2nd or 3rd xylol.
Simple Procedure for Double Staining
- Prepare each dye or stain separately and put in a staining dish
- Arrange the glass slides in a staining rack.
- Immerse the tissue sample in xylene for 10 minutes.
- Rinse the sample in fresh xylene for 5 seconds.
- Rinse in absolute (100%) alcohol for 10 seconds.
- Rinse in another absolute alcohol for 5 seconds.
- Rinse in 90% alcohol for 5 seconds.
- Rinse in 70% alcohol for 5 seconds.
- Rinse in 50% alcohol for 5 seconds
- Rinse in tap water twice for 5 seconds each.
- Next, immerse sample in hematoxylin neutral solution for 15 minutes
- Dip in 1% acid alcohol to differentiate or get rid of excess stain
- Rinse in water twice for 5 seconds each.
- Next, immerse in eosin for 5 minutes.
- Dip in water to rinse for 2 seconds.
Hematoxylin and Eosin (H/E) and Other Required Solutions
Hematoxylin preparation:
Either of two methods can be used. One of these is the progressive method which requires the addition of excess acid or salts in the solution to increase the accuracy of nuclear staining. The other method known as regressive staining requires a neutral hematoxylin solution to over stain the tissues; afterwards wash the slides by dipping in acid to remove excess stain and then rinse in water to neutralize the acid wash.
- Dissolve 5 g of hematoxylin in 50 ml of absolute alcohol.
- Dissolve 100 g of potassium alum in 1000 ml of distilled water by heating.
- Mix the two solutions obtained in the preceding steps i and ii and then heat as fast as possible so as to boil within one minute while stirring at frequent intervals.
- Next, remove from heat and add 2.5 g of mercuric oxide slowly.
- Heat again to boil slowly until it turns dark purple,
- Remove from heat and immediately thrust the kettle or flask into cold water and allow
However, if the progressive method is chosen, about 4 ml of glacial acid per 100 ml of solution should be added and filtered before use.
Eosin preparation:
- Dissolve 1 g of the dye in 80 ml of distilled water.
- Mix the solution with 320 ml of 95% alcohol.
- Add 0.4 ml or a few drops of glacial acetic acid.
Preparation of 1% acid alcohol when using a total volume of 100 mL, requires the addition of 99 mL of 70% ethanol to 1ml of hydrochloric acid (HCL).
Mounting and placing coverslips
The final step in this procedure is to permanently mount the sections under a coverslip.
This involves covering the tissue section in an ideal resin medium such as DPX or Canada balsam to keep specimen in place and protect it from accident contact.
- Use a dispenser rod to apply 1 or 2 drops of DPX on the slide while being placed on a level surface.
- Place the cover slip gently from one side of the droplet to avoid any air bubble inside it.
- Put slides in a warmer, or just expose them to normal room air to dry for at least 6 hours and then cut excess medium from the edges of cover slip with a razor blade.
Photomicrography
This is a process by which images of specimens of interest are captured using a camera attached to a microscope that is connected to computer interface.
Photomicrographs of histological tissue can be taken using Motic image plus 2.0 ML – the model 35 moticam camera
- Fix the camera to the eye-piece of the photomicroscope to view the tissue through the various objectives of the photomicroscope.
- Connect a lap-top as computer interface to the photomicroscope to aid viewing.
- Observe the image of the tissue viewed on the lap-top screen.
- Capture the image and store for evaluation or studies as desired.
- For each sample of tissue under study take photomicrograph at low power objective x10 and at high power objective x40 of the areas for study.
Read more: Microtechniques
Process of Fixation (Histology)
Collection and Selection of Specimens or Tissue for Whole Mount, Smearing, or Testing